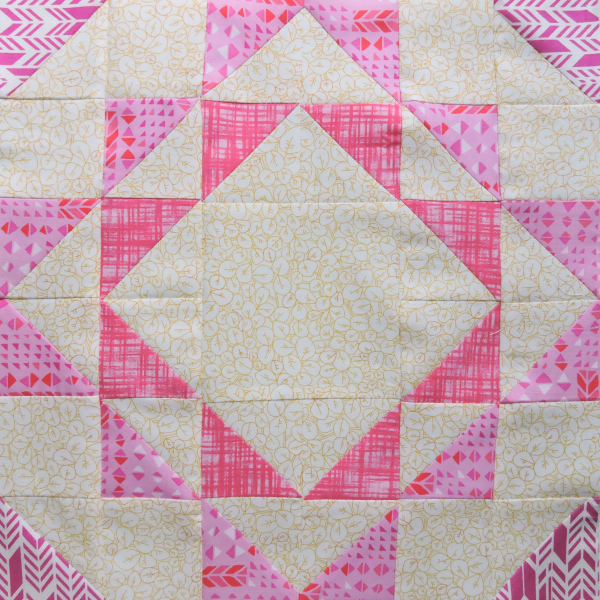
Half-square triangles, or HSTs, are one of the top quilt block units in quilting. The number of ways in how you use them is endless, and the number of HST quilt blocks surely number in the thousands! I would have to say that HST quilt blocks are my favourite for this very reason. You can make them any size, in any fabric and today I’m showing you how to make them using the two most popular methods – the traditional method and the alternative method. Both require two squares of fabric, but the size and method of sewing will determine how many HSTs you create in one go.
Traditional Method
This method will create 2 HST units from your two pieces of fabric. The benefit of this method is you’re working with the grain of the fabric, and therefore less chance of stretching when sewing the units together. This method is also really good for chain piecing, although it can be easy to lose track of which line you’re supposed to be sewing 1/4″ away from… Or is that just me?!
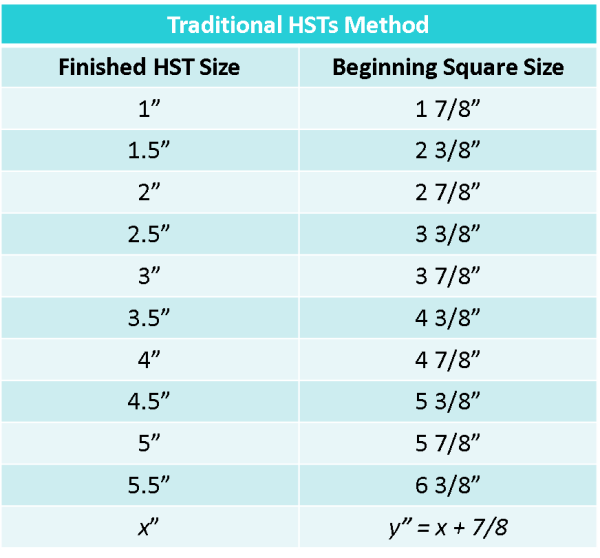
To determine what size squares you need to cut, all you need to know is what finished size you need – that is, what size you want them to be once all sewn together – and then add 7/8″ to that measurement. However, I would highly recommend adding the whole inch to leave yourself some excess to trim so as to improve your accuracy.
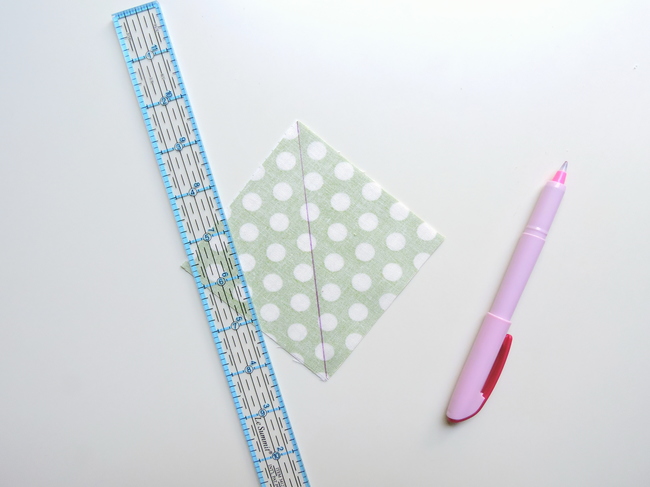
Step 1. Place two squares of fabric right side together. Draw a line diagonally from one corner to the opposite corner.
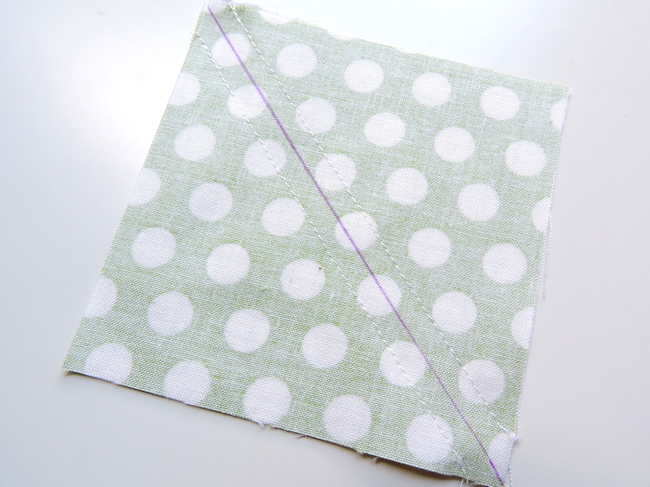
2. Sew 1/4″ from either side of the line; backstitch at each end to secure your seams.
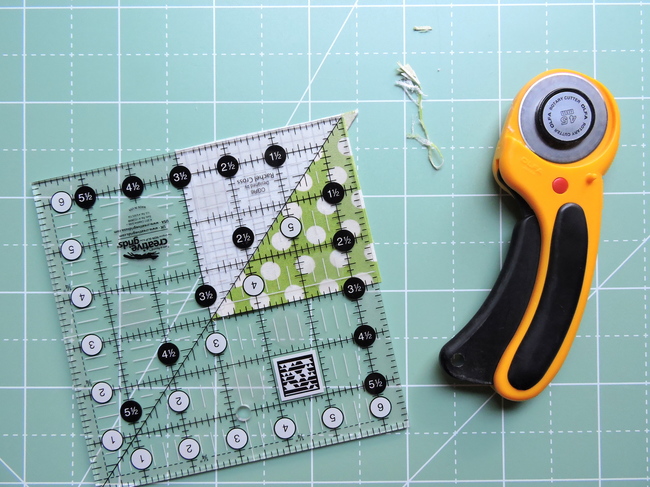
Step 3. Cut along the drawn line, open the fabric pieces and press the seams open.
You may need to trim down to even them all up or to achieve a specific size, depending on how accurate your cutting and sewing is!
Alternative Method
This method uses larger squares of fabric but you create 4 HST units from the fabric. It does create bias edges, but careful pressing (don’t “iron” back and forth, just press down with a hot iron and no steam) and pinning if you need that extra security should mean that you don’t get any bias stress.
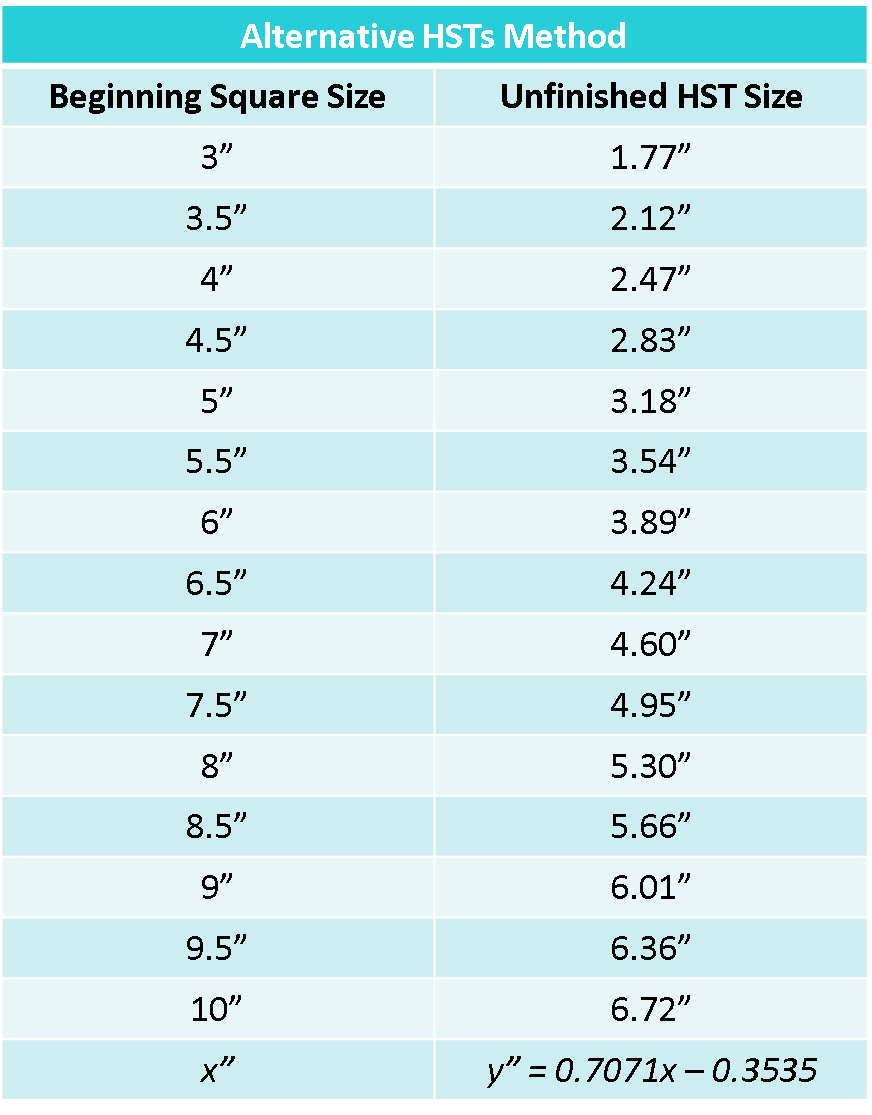
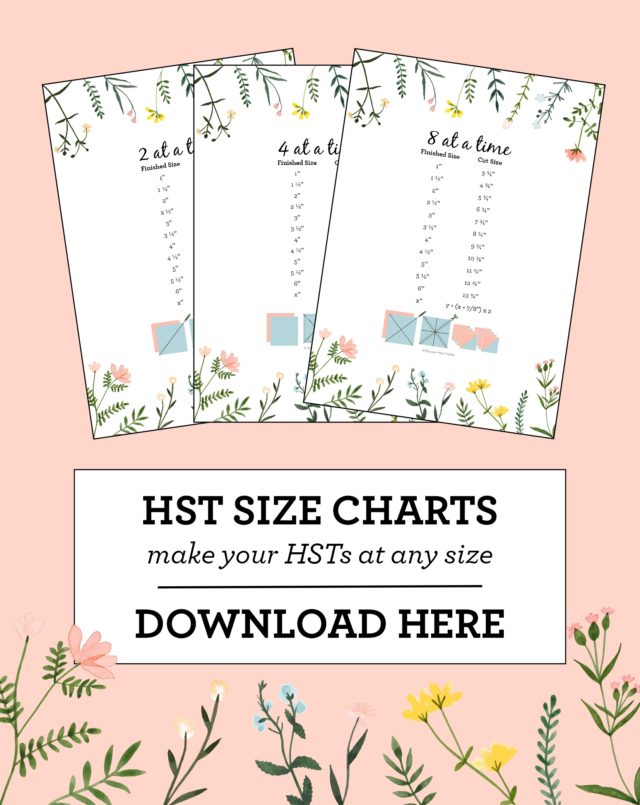
The math for the alternative methods is a lot more complex, and instead we’re working with the unfinished measurements – that is, what size the HSTs are before you’ve sewn them all together. I’ve left the measurements “raw” so that you can work out how much excess you want to work with. For example, a 5″ charm square will give you four 3.18″ unfinished HSTs, which means you can trim them to 3″ square and end up with 2.5″ finished HSTs once all sewn up.
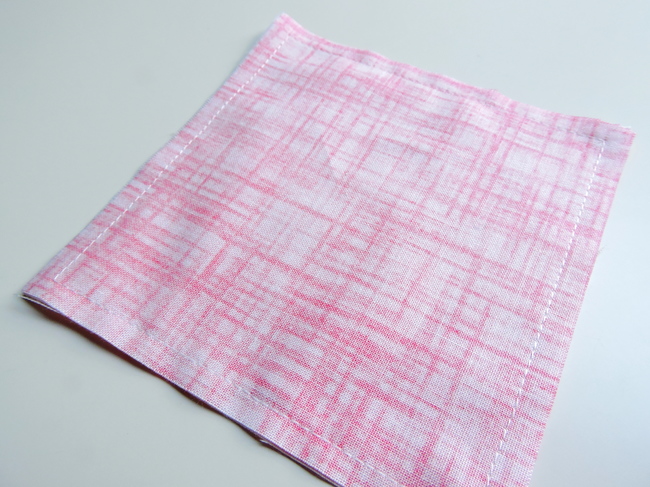
Step 1. Place two squares of fabric right side together. Sew around the outside a scant 1/4″ from the edge.
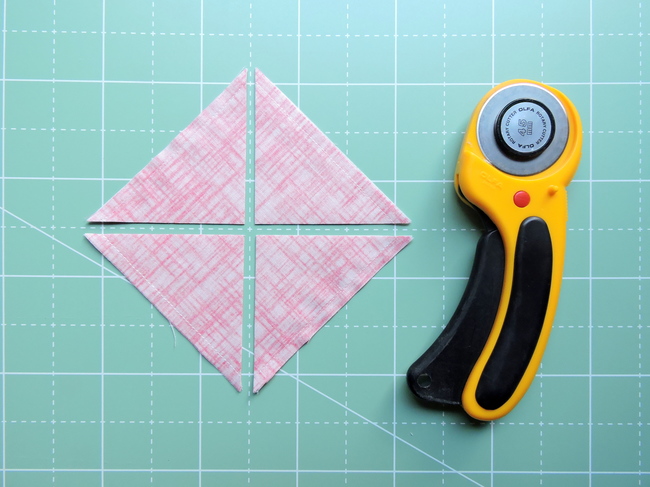
Step 2. Cut on both diagonals to get four pieces. Open the fabric pieces and press the seams open.
Step 3. Trim your HSTs the unfinished size needed for your project.
Compare The Pair
Which method you choose to use depends on how many HSTs you need, and how many of each combination you need! Let’s compare:
You need twenty-four 2.5″ unfinished HSTs for a 12″ finished Ripples block. Using the alternative method, you will need to cut six 4.5″ squares from both fabrics, which means you will need fabric that is about 9″ x 13.5″ for each fabric. And you will sew 6 seams.
Using the traditional method, you will need to cut twelve 3″ squares from both fabrics, which means you will need one 9″ x 12″ for each fabric. And you will sew 24 seams.
The larger the triangles, and the more you need to sew, the more fabric efficient the alternative method is, plus less seams to sew! If you are comfortable with the bias edge, it’s definitely the way to go. If you only need a few HSTs, like for a quilting bee block, or want a variety of prints within the block, the traditional method is the way to go to get the variety of prints needed and so as to not surprise your bee member with bias edges.
Other Tutorials
If you want to make eight HSTs at a time, make HSTs from strips of fabric, or want to check out triangle papers, then I have those tutorials too! Just follow those links to the one you’re interested in.


Kristy QP says
Ooh you and the hubby are a bit awesome working out that maths! I know I’ll be bookmarking this page for future reference! Thank you!
Sue says
What a great tutorial, I like using the easy angle ruler when making HST as the outside is always on the grain. I first learnt how to use this when I did a Bonnie K Hunter of Quiltville mystery quilt. She gave great instructions as well even for a left hander like me.
Glad to see you are settling in to life in Japan, my friend Clare had her daughter teach there for a couple of years and they have a great friend who lived with them when she was here teaching.
Happier Than A Bird Quilts says
Oh my head hurts 😉 Thanks for the charts! I usually do the traditional method, but I am excited to try out the 4 from one square.
Sheila says
I have used both methods, One need’s to be careful with the alternative method tho’as the outside edges are on the bias and can stretch during piecing, that said its a terrific method of getting four HST’s quickly. Well done on the Math
Sarah says
Thanks for posting this! Very interesting!
Laura says
OH
MY
GOSH
you rock. you really do…
Artsy-Craftsy Ivy says
So with the new method, do you cut the pieces down after you cut them in fourths or do they end up being the right size when you sew them to whatever project you’re using them in–cos the sizes are so weird?
Amy, a redeemed sheep says
I love that you figured out the math for us! I may have to kiss you both!
Amanda says
I’ve always used your new method…I can’t stand the thought of marking all the squares with a line. It just seems like an extra step. I’m glad that you brought attention to this method!
LisaW says
What a great tutorial! I have been thinking about starting a quilt, and the idea of cutting and sewing individual triangles together was doing my head in! Thanks for sharing this…you’ve just made my life that much easier!
Teri says
Thanks for working out the math
Teri says
Thanks for working out the math
Annemiek says
Came across your tutorial while searching for HST’s. I make mine the same way, cutting a square in four pieces. My math is kind of trial and error so your chart will come in handy.
What i do is cut the starter square on the bias, and you hst’s will come out with a straight grain all around!
Anonymous says
Thank you so much for your calculations. I love blocks that use only squares and hst’s but the dreaded math makes me stall. I’m pinning, printing and saving this!!
Judy Cooper Textile Images says
following via email.
Amy DeCesare says
I have just seen that alternate method recently. I like Annemiek’s idea, to cut the original squares on the bias and end up with straight grain edges – look like the best of both worlds!
Kelly @ My Quilt Infatuation says
Alyce, I’m putting together a chevron quilt tutorial, using the alternative HST method. Would it be okay if I used your Alternative HST math size chart on the tutorial and credited you with a link back to your blog? Just let me know!
🙂 Kelly @ My Quilt Infatuation
donna says
how can I print this out?
Kimberly @ RobotMomSews says
Hi there, I am doing a tutorial on HST’s and your chart is the best! I am referring to your chart for guidance and I am linking back to you and giving full credit. Thank you!!!
Carmen says
Thank you!
Kathleen says
I like the swelling pen you use…is that water soluble? Where did you get it?
Thanks for the tutorial. I have a square I would like to make into a cute star and this was the perfect tutorial for me. The chart was very helpful too b/c I am not using a usual size square. Thanks! : )
Alyce says
The Sewline pen is AWESOME! It’s air soluble, so it just fades after a little while (quicker if left in the sun), and yes, it’d wash out too. One of the cheapest places I’ve found is Fort Worth Fabric Studio at $3.79!
Janet L. Wilson says
I was taught the above methods and they work well, but have found if you need to make larger numbers of HST’s, the 2 at a time/4 at a time methods are very, very slow. And somewhat prone to accumulated error in construction. The BEST way to make HST’s is with Brenda Henning’s Triangulations CD, which lets you print on your home printer sheets of HST patterns, which you sew up in multiples at a time, very speedy and dead accurate, I think Quilt Pro has a similar program, but you can download a sheet from the Triangulations to try this out. Extra HST’s you make can go into your “Parts Department” for spontaneous projects you design on the wall, or for little projects. Sheet is here to try: https://www.bearpawproductions.com/userfiles/file/Half%20Square%20Sample%20Grid.pdf
And there is a Youtube video: https://www.youtube.com/watch?v=0z6o7Bh7MYg
I am not trying to sell anything but I have this product and it changed my sewing life!!
Alyce says
Yes, these methods are best when you’re making something block by block! You can find more HST tutorials , ie.for eight at a time here: http://www.blossomheartquilts.com/2015/05/hst-tutorials-and-tips-for-accuracy/
Ms BeachLizard says
I’ll stick to the traditional method thanks. 🙂
Darrin says
Thank you for this, I have been searching for a while on how to work this out. At last the Dark Art of HST’s as become clearer.
Alyce says
You’re very welcome! Glad to be of assistance 🙂
Ali says
Hi there!
I am pretty new to quilting and I still have a tiny question. I am making HST with the 2 at a time method. In your notes it says add 7/8″ but that it is just easier to add a full inch. So I added the full inch, but now I am stuck again. I think I need to trim them down but I’m not sure by how much…
I’m so sorry if my question isn’t clear. I am just very confused and can’t figure out how I managed to mess up something so easy hahaha!!
Thanks in advance!!!
Alyce says
Yep, you need to trim them to a 1/2″ bigger than what the finished size will be (aka what you added 1″ to for the cutting size)
Ali says
Thank you, thank you, thank you!!
Alyce says
You’re very welcome!
Ann says
Hi. I can’t make the math work for the “4 at a time” chart. All the others, x is increased by adding and/or multiplied, but this one, you end up with x being decreased. Y must be bigger than x.
Any chance you can double check that?
Alyce says
Y is the unfinished HST size, and X is the cut size of the squares used to pair and sew into HSTs. So therefore, Y will be smaller than X.
Quincy Standage says
OMG! Thank you, thank you, thank you! This helped me tremendously!
Cynthia A says
This is amazing! I was putting off starting a project because of all the half square triangles needed. I tried the method to get 4 finished HST out of 2 squares sewn together at the edges and I got the best HSTs that I’ve ever sewn! Thank you!
Alyce says
You’re so welcome!
valorantsepeti.com says
Valorant random hesap satışı, valorant hesap satışı, valorant skinli hesap satışı, valorant skinli hesap satın al
Peggy says
Thank you so much for the charts !
Debbie says
I have a question- I have fabric that needs to be made in one direction. So when u use the HST method I can only use one of the squares made. Do I figure on buying a lot of extra fabric and the throw the other square away? Or can I merely cut 2 triangles and sew together to make a square? If so, what size triangles do I cut to make a 3 1/2” square?