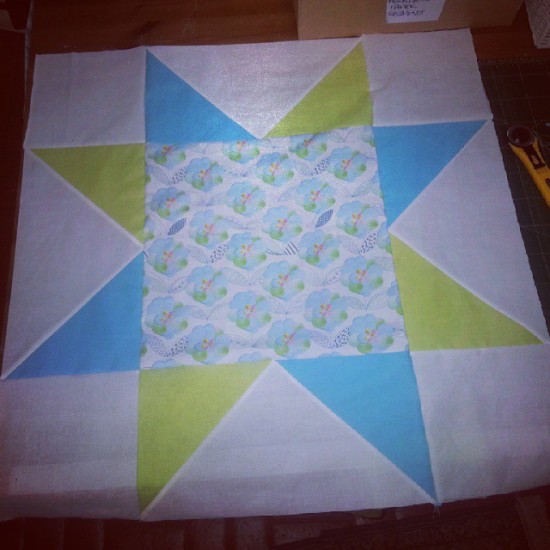
Last week, Gemma from Pretty Bobbins shared her tips and experiences from quilting two Bright Sky quilts this year. This week, I asked one of the other quilters whose I really admire, Jess from The Elven Garden. Gemma is a longarm quilter, but Jess does all her magic on a domestic machine like most of us. So I asked her to share a bit about the different ways she might go about quilting a Bright Sky quilt.
———————————
Thanks so much Alyce for asking me to guest post about my favorite part of quilting. I’ve been quilting for a bit over three years, and although I love piecing and designing, my true love is free motion quilting. Over the last eighteen months or so, I’ve started to really custom quilt my quilts on my domestic machine and it is seriously SO much fun. You don’t have to have a massive throat space to do this kind of quilting either – my machine has about 7.5″ throat space and although it can be tricky to quilt the centre area of quilts, it does get easier with practice. I’m running a free motion QAL at the moment, and you can read lots of FMQ tips from some fabulous guest posters here.
Although I haven’t made a Bright Sky quilt, Alyce sent me an image of the quilt design which I printed out a few times and sketched a few ideas for how I might approach the quilting. This is the approach I’ll often take to deciding how to quilt my quilts if I’m a bit stuck on ideas, and I think it’s a really good way to play with ideas and find something you think will work. If you’re interested in the how-I-quilt part, I’ve recently started a YouTube channel where I demonstrate how I approach a few free motion quilting designs. There will be many more of these to come!!
If you’re not a confident free motion quilter and would prefer to quilt it using your walking foot, I think you could get a pretty amazing texture by quilting the quilt something like this. You wouldn’t have to do too much marking to get this effect either, if you have a guide bar you can attach to your walking foot. Something you could do with this type of quilting is gradually make the quilting lines further apart as you go out toward the edges of the quilt. I think it would be a really interesting way to quilt it, and I like the fact that it accentuates the on point squares in the outer section of the quilt.
I absolutely love doing straight line FMQ on my domestic machine. I think you can achieve some fantastic results, without the pain of turning the quilt as would have to if you used a walking foot. As soon as I saw this quilt design, I immediately thought straight line FMQ in the negative space would be really effective. Something to keep in mind when quilting any quilt is that quilting on solid or very light value fabric shows up much more than on darker coloured prints. Because of this, I almost always plan how I’m going to quilt the negative space before I think about quilting print fabric. In fact, I’ll often quilt the negative space and decide on how to quilt the rest of it while I’m doing it.
For the Bright Sky quilt, I think all the geometric lines lead itself to some point-to-point straight line FMQ perfectly. Because the areas in this quilt are quite large I would mark quite a few reference lines, or at the very least points to aim for within the ‘blocks’. Straight line FMQ is surprisingly easy to do – especially if you work straight up and down within your machine (pulling and pushing the quilt straight toward and away from you.) Even if your lines are a little wonky, the texture it gives your quilt is amazing (and quite different from straight line quilting with a walking foot), and once you’ve washed it the wobbles do disappear a lot!
I sketched up this design pretty quickly, and there are some things I like better than others. I love the diamond shape quilting that kind of explodes toward the outside of the quilt (in the negative space), but I don’t think the quilting within the coloured areas works all that well. If I was going to go with this quilting idea, I’d scrap the ideas for the colored sections, and use some swirly, curvy designs instead. Maybe some echo shells, or swirls, or even feathers.
This final sketch is much closer to the sort of thing I’ll do when I’m planning how to quilt a quilt. I had a firm idea of how I’d approach the centre star in this sketch, and that the negative space would all be quilted in a swirly/pebbly design. I wasn’t sure about how I’d approach the outer triangles – so I tried out a few different ideas to see what might work best. I think the triangles to the right work best alongside the centre star in this sketch, but the feathers would also look pretty cool.
I hope these little sketches have given you a few ideas on how you might approach quilting your Bright Sky quilt. The options are seriously endless, but if you’re stuck I would suggest taking a photo of your quilt, printing out a few copies and trying out some ideas. FMQ designs don’t have to be complex to be effective!
QAL Housekeeping
Don’t forget that you can now vote for my original Bright Sky quilt in the Large Quilts category for the Blogger’s Quilt Festival!
Shabby Fabrics still has their 15% code running until the 21st – just pop in BrightSkyQAL at checkout.
And lastly, this week’s Instagram winner – @sewbeecino! She’s just started her centre star, so it’s definitely not to late to grab the pattern and jump on in!! Because next week is linky week!! It will be open for a whole week, before voting for the viewers’ choice begins.


DeborahGun says
oh these are great ideas from the brilliant Jess. I hope to get mine basted tomorrow and then keeping my fingers crossed that I can quilt it!
Pam Arbour says
I love all of your quilting ideas. I also liked seeing them on the sketch book. Sometimes, I think a sketch book is an easier way to see the designs. Thanks for your input.
Pam
Jenni says
Thank you for this post! This is the part I really need help on and these pointers from Jess are really helpful. I will go check out her You Tube videos, too. One question, though, when you do need to make some guide marks on your quilt top, what do you use to make the marks? Would something like a dressmakers pencil be good? It would be just my luck to mess up my quilt top with something that won’t wash out well! Thanks!
Alyce says
I personally use a hera marker for my straight lines, or an air-erasable pen like Sewline. I personally do not recommend Frixion pens as I haven’t had good luck with those (especially on solids), although I know people do use those.
Carla says
I never put the thought into quilting designs that I ought to. Printing out a photos – such a simple but effective idea! I also like all the choices: there is no wrong just different ‘rights’.