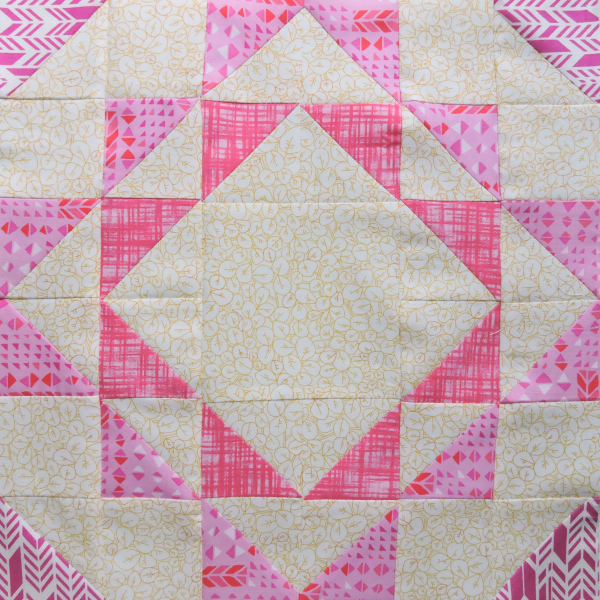
Hi everyone, it’s Angie from GnomeAngel.com and it’s my great pleasure and delight to reveal the 12″ finished quilt block I designed for The Bee Hive: Ripples. (That’s ripple, not nipples as some of us are prone to read it! Filth pots!) This pattern works well in all solids, only 2 colours, scrappy or with a little mix of everything. The repeat creates a lovely ripple effect like stones (the squares caused by the corners) being thrown into a pond.

This block is all squares and half square triangles (HSTs). The nature of the design allows for a little bit of wiggle room when it comes to matching the points, which is just what we all need!

What you need
Solid (Aqua)
12 x 3.25″ squares (or if you’re like me and you need just a smidge more wiggle room cut to 3.5″)
Background (White)
12 x 3.25″ squares (or if you’re like me and you need just a smidge more wiggle room cut to 3.5″)
1 x 4.5″ square
8 x 2.5″ squares
General Information
- Use a quarter inch seam
- Press half square triangle to the dark side
- Press all other seams open
Hints and Tips
- I used a 6.5″ BlocLoc Rule to trim all of my half square triangles – it made a world of difference!
- I used a 70/10 needle with 50wt thread to help with accuracy
- Don’t move your iron over the blocks too much, just press them to help them keep their shape
- I made 4 of the blocks in one sitting and turned them into a mini (you can see it on my blog at GnomeAngel.com)
- I snuck in a couple of printed triangles to my solids to add interest and be a bit cheeky
- Have fun with the triangles mix prints, solids, colours and maybe go for an unconventional background colour
Make Half Square Triangles
- On the wrong side of 12 x 3.25″ squares draw a diagonal line from the top left hand corner to the bottom right hand corner. (Diagram 1)
- Place 1 x 3.25″ square of solid right sides together with 1 x 3.25″ square background. (Diagram 1)
- Using the line you drew as a guide stitch a quarter inch seam down both sides of the line (as per red lines on diagram 2).
- Cut the sewn block down the line that you drew on the wrong side of the background square (as per diagram 3).
- Press seam to the darkest fabric and create 2 half square triangle blocks (diagram 4).
- Trim the half square triangle blocks to 2.5″ squares.

Block Layout
1. Layout the half square triangles, 2.5″ squares and 4.5″ square as per image below.

2. Chain stitch the squares together in groups of 2 as per image below.

3. Chain stitch the pairs together to create blocks of 4 as per image below.

4. Chain stitch blocks together as per image below.

5. Join remaining blocks in row to each other as per image below.

6. Join rows together as per image below. This is the only step in the process where I used pins (might have had a neater finish had I used them sooner, but I like to fly by the seat of my pants). You need to keep the vertical lines together, so be sure to match the middle seams with pins first and then move on to matching the outer edges.


7. Join the remaining row and give the block a good press. Stand back and marvel at your own awesomeness.
Alyce’s Take
I’m going to admit something – when HSTs get as small as 2″ finished, I get a little nervous about them being oddly shaped or stretched when pressing. So I decided to use my 2″ Triangles On A Roll to help me get them as accurate as possible before sewing them together.
It’s not necessarily quicker, although it did mean I could make each of the 3 colour HSTs all at once instead of two at a time, especially all the Paradiso (multi-pink print) HSTs! If you are making this for yourself, you could also cut down on the use of HSTs by replacing some of the units with flying geese or “half” flying geese (only one triangle). If you’re making this for a bee, keep to the instructions so that all blocks are the same!
May Sponsor
This month, the beautiful Rita from Fabric Please is offering 25% off with the code BEEHIVE! Simply shop to your heart’s content and enter the code at check out. For those who are international (she’s in Canada!), she personally calculates the cheapest shipping and will refund accordingly.
You can find all the block tutorials on the original The Bee Hive post. If you’re sharing your blocks or quilts from The Bee Hive on social media, be sure to use #thebeehivequilts and @blossomheartquilts and @gnomeangel so we can find your awesome work!
If you are in a swarm for The Bee Hive, please see the quilting bee etiquette post for answers to any questions you may have. If it’s Ripples-specific regarding the block construction, please ask in the comments on this post and I will answer it here so that everyone can benefit from the question/answer.


abby @ thingsforboys says
love this block. Ripples is the perfect name for it!
Alyce says
It really is, isn’t it?! It was just begging to be done with the (kinda) gradient of fabric!
Allison Reid says
Thank you for sharing your block and this very clear tutorial. Funny, I’m on a HST high at the moment too! I’ve just designed and put together a table runner using them – I’ve been taking photos along the way with the aim of adding a post to my blog. Katy has a beautiful HST quilt in the Bloggers Quilt Festival: https://katyquilts.wordpress.com/2015/05/15/bloggers-quilt-festival-spring-2015/
Alyce says
They’re just so versatile!