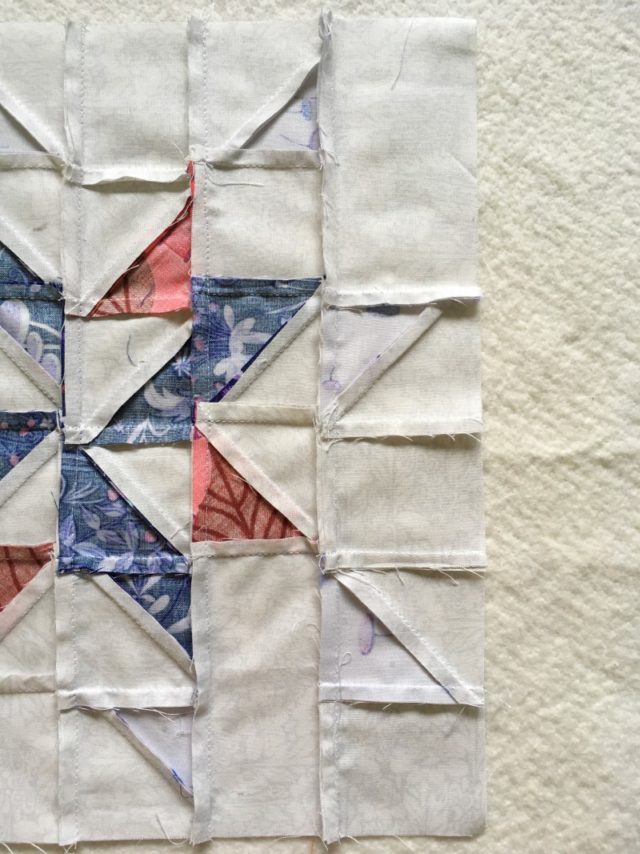
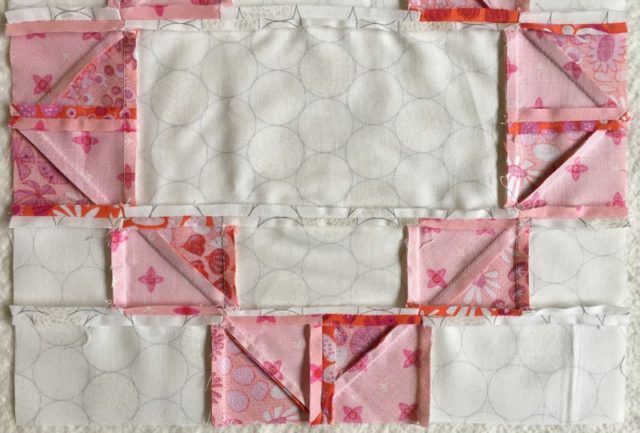
There’s one thing that many of you have discovered when sewing along to the Modern HST Sampler, and that’s the bulky seams that sewing with half-square triangles can bring. For each tutorial, the guest designers and I provide the pressing instructions, however you are always welcome to press them differently if it works better for you. Today, I’m sharing the back of a couple of quilt blocks that use HSTs, and how and why I’ve pressed them the way I have.
Let’s start with a block with many HSTs. When you have a lot of seams to align and points to keep, it’s best to press each row’s seams in alternating directions. This allows the seams to nest when you sew one row to the next – they nestle into together, so that you can be sure that the seams are neatly aligned. You can see that the seams in each row go a different way.
However it does create a lot of bulk at the seams – some of those seams have 5 layers of fabric! If you are more confident at aligning seams, you can always press the seams open between your half-square triangles to reduce the amount of fabric at each point. And especially do so if there are no seams to align like in the block below!
As to which way to press the seams, well, a good place to start is alternating directions for each row like in the first block. If you have less units to sew together into rows like in the second block, you can sometimes get a bit clever and press in a variety of direction for each row, depending on the pieces. You can see that the half-square triangles and background pieces alternate neatly so that you can always press towards the background and the seams will naturally nest together.
The last question to answer is how to press the row seams once the block is all pieced (I pressed these blocks in both open and to the side just to demonstrate the different ways to press seams). This one comes down mainly to personal choice, especially in terms of how you’re going to be finishing and then using the project. If your blocks are being sewn together with no sashing, you’re going to want to try and nest those seams too if you can. If you’re using sashing, then it doesn’t particularly matter. Some people will press open to reduce the bulk of the final project, especially if it makes quilting easier for them. Others will press to one side, any side, to make the seams more secure. And let’s be honest here, sometimes you just can’ t be bothered fiddling with so many seams and hot iron trying to press the rows open!
Yes, pressing seams open may lead to more stress being put on the seams and thus a risk of them popping open. However, that is more of a concern if your project is going to be very well loved and used like a pillow, with inserts coming in and out for washing, and being thrown or squashed or sat on or fought over… Or maybe that’s just my kids?! If it’s going to be in a quilt, the actual quilting would be enough to secure it in place anyway, and quilts don’t tend to get quite as much rough and tumble action like pillows do. Well, not usually, anyway.
How To Press
I can’t finish this post without mentioning some tips on how to actually press:
- Steam is your best friend if you’re trying to coax the fabric stretch just that little bit further, or to sit especially flat.
- Ironing back and forth is your worst enemy, unless you are particularly after the wavy, non-square block look.
- Pressing means up and down, a gentle little wiggle to coax a seam open, and a slow, gentle glide along a row of seams if you’re feeling confident in your pressing.
- Can’t be bothered getting the iron out for the little seams in between your half-square triangles or pieces? Me either. Use a Clover finger presser.
- Press the back of the block first, and then flip it over to give it a press from the front too.
I hope that helps answer any questions or concerns! As always, you can leave a comment or question on any post (this one or the QAL posts or whichever) and I will reply – either via email directly to you, or if it’s the kind of answer that would be useful to others, I reply to your comment on the blog (for which you get an email notification for anyway, assuming you put the correct email address is!). Go and press like the wind! Gently, that is…
Post contains affiliate links. This just means that if you make a purchase, I may get a little commission, which helps keep this blog up and running and writing posts like this. Thanks for your support!


Margaret (margiestitcher) says
thanks for all the useful info I find it pressed to one side they are easier to line up but sometimes press open, have read that pressed to the side puts less stress on the seam not sure if this is correct though.
Love my clover mini iron but tend to use my old dry iron for pressing the blocks will try the steam one and see how I get on
Alyce says
Yes, pressing open can cause more stress on the stitches, being more “exposed” if you will. But proper quilting should usually hold it in place!
Bonnie says
Very helpful information! Thank you.