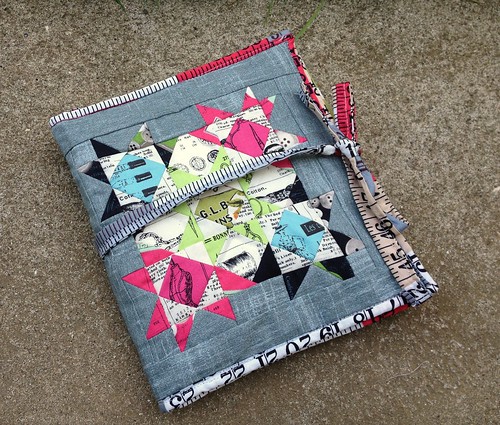
I finally have need for a travel sewing kit! In four weeks, I’m leaving on a jet plane for Osaka! A long-awaited, rescheduled-thanks-to-cancelled-flights crafty weekend with a friend I met online. It’s the typical online relationship – find her blog, admire her work, find ourselves in a Japanese crafting Facebook group together, become Facebook friends, get invited to stay with her for a weekend… It was supposed to happen last November but Jetstar cancelled the flights, then life happened, and 7 months later we’re back on. Thus, I need a travel sewing kit!
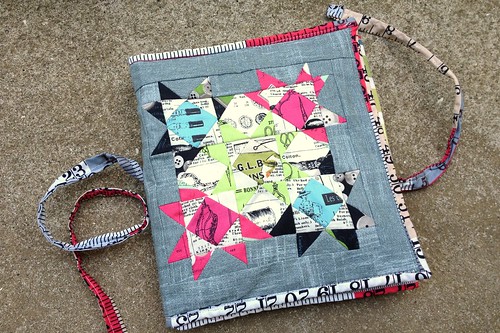
This poor baby has a few cosmetic issues, but like any fabulous mother, I look past these and see the inner beauty and functionality she has. It all starts with the front cover – originally supposed to finish approximately 9.5″ square, I attempted to miniaturise it as I didn’t want a big sewing kit so it could slip inside my handbag. And one thing you will hear me moan about is my inability to do tiny piecing. Once we get under 2″ measurements, things start to go pear-shaped. Literally and figuratively. So I have lost points, I have unintentionally-wonky stars, and I had to add borders to make it square and usable, meaning it finishes up at 8″ square anyway.
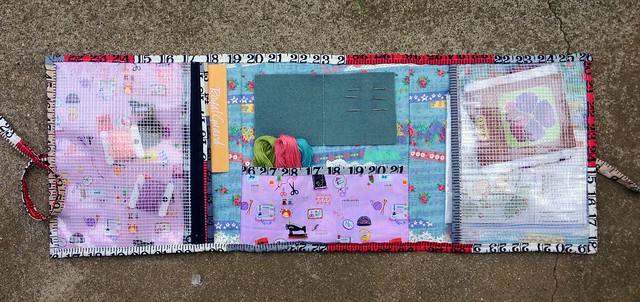
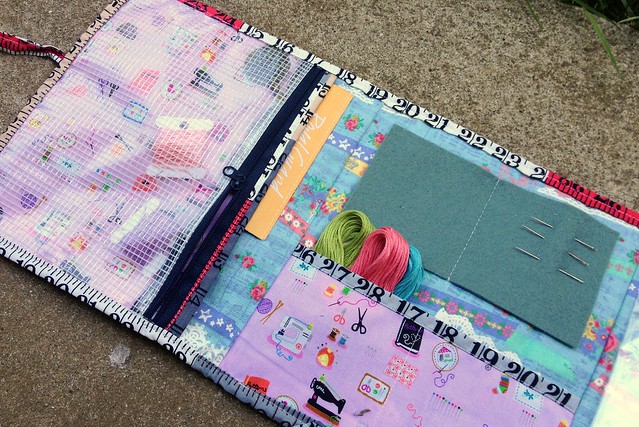
Inside, as we look past the scary binding job, we find three sections which is like her tutorial parent and unlike her 2-sections-only Patchwork, Please! parent. We also find that I shamelessly stole Hadley’s idea of cutting up a vinyl pencil case from a cheap store (RIP Daiso pouch) and using the parts to make up the pockets. This involved unpicking the pencil case into 2 halves – one with the zipper still attached. I added the pink sewing print and binding to create a pocket behind the zippered pocket and simply binded the top edge of the remaining vinyl to make a pocket for the other end. In the middle I have some wool felt for my needles and a divided pocket along the bottom edge.
It only broke one needle, which prompted me to swap to a bigger needle, something I should’ve done at the beginning! As for fabrics, the cover panel uses a selection of Japanese sewing prints and Painter’s Canvas and I used a muted rainbow stripe canvas-ey cloth from Ikea for the rest of the outside to give it some substance. I used a layer of batting in the middle, and the blue washi/trim fabric (available here in pink) on the inside is a cotton/linen blend so they’re all working together to make it sturdy. The vinyl pockets help with that too! The pink sewing print… I can’t remember where I picked it up! The measuring tape binding is a no-name from my small but growing stash of measuring tape fabrics.
What would I do differently next time? Swap which side of the pouch I used for the pocket so that the zip opened from the top/down. I had been planning on hanging my Clover thread cutter from the zipper pull, but I can’t now otherwise it would hang out from the bottom! I would also cut my binding a bit wider as I had to do a little trimming to make it fit, oops.
And while we’re talking about Japan and fabrics, today’s the last day to order this month’s children’s Japanese Bundle Club!


Actually Amy says
Have fun in Osaka! I have been there before and it was my first taste of an international city, the bright lights, the inordinate number of baseball fields, the people, the buildings! That was one overload of sights for a 15 year old school girl on her first trip overseas.
And your travel sewing kit is gorgeous.
Heidi Staples says
This is absolutely stunning, Alyce! I love it!!
Mara says
It looks AWESOME, love it.
Cynthia says
That is so funny! I just made a travel sewing kit from that tutorial! I love your mini patchwork, it is awesome!!! I love your upgrades too, such as the zippered pocket….wish I had thought of that 🙂
Flying Blind... says
It turned out really well; the baby has personality xxx
Liz DandeliondD says
It’s totally gorgeous.
Sarah Lou says
It looks great, would never have notice the niggles that you mention. Enjoy osaka!
Nilya says
The Vinyl pockets makes it perfect – love it!
Patchwork and Play says
I saw this on Instagram…its wonderful! And great improvements too!
Deborah says
so pretty 🙂
amy says
Love it!!! The zipper pockets are such a fabulous alteration. I’m so glad you enjoyed the tutorial. Have a blast on your trip!!!
Happier Than A Bird Quilts says
This is fantastic! It’s so cute but so practical and useful.
Kelly Young says
what a fun idea!! and unintentional wonkiness or not, I think your piecing looks great on the front. I’m impressed that you even tackled bits that small, ha!
-Kelly @ My Quilt Infatuation
Judy H says
I love it when you start a project like this and go your own way. Makes it yours and more fun. Great job.
ayumills says
I seriously love the way your sewing travel pouch turned out, so thanks to Etsy not offering any modern travel pouches! It is such a cool idea to combine my traveler’s kit tute with Amy’s great sewing pouch tute this way! The way you used the store-bought vinyl pouches is soooo great! Now I know I will have to get those so I will be able to copy you and Hadley! Hope you enjoy your trip to Osaka! I bet it will be much much hotter and humid there, but meeting an online friend is always so fun!!!
Cassandra says
Love it! You did a great job!!
Aoife says
Kelly’s right your piecing on the front does look great, and I love the tape measure binding. All the niggles in making are definitely not visible (to me) in the finished product. Have fun using it on your sewing travels!!
The Sassy Quilter says
Too cute! I love this. I bet this will come in handy. Adding it to my to do list:)
Following on bloglovin’
Britt G. says
This looks really cool – I love the cool use of the sewing print fabric.
Kristy @ Quiet Play says
It looks just fantastic – well done on mixing and matching to make the perfect kit for you!
Mara Cockman says
Awesome job! I love it. I have been thinking about trying the one in Patchwork, Please!, but I like what you did much more. Thanks for the great ideas and have fun on your trip 🙂
Lucy @ Charm About You says
A brilliant case! I love all the fabrics you’ve used and the tape measure one is so cute! Thanks for linking up to TGIFF!
Debbie says
This is really fun – love your fabric choices. and so clever to use that purchased zip bag. Thanks for sharing all your tips.
Heather B says
Love! The binding, the zipper pockets! I need to make one 🙂
Capi says
What a cute idea…and thanks for the tip…I will put “travel sewing kit” as one of the tags for a similar thing I designed in my etsy shop. I like your clear pocket idea, especially.