Time for the second block of the Modern HST Sampler! By the end of the year, you will not only have made 24 blocks in total, and thus a beautiful sampler quilt, but you will have some well-honed HST making skills. If you need more information, you can find out more about:
- The QAL and fabric requirements
- Required and recommended tools
- Tips for HST accuracy
- Frequently Asked Questions
This quilt along is structured so that you will slowly ease your way into half-square triangles. We’re starting off with 4″ finished HSTs (4.5″ unfinished) – they’re nice and big, and are used in nine-patch blocks to make a 12″ finished block (12.5″ unfinished). This means few seams, and thus keeping your HST points is much easier.
The quilt along is also structured to ingrain this info into your head. The first three block tutorials will cover the three ways of making HSTs we will be using for the year – the traditional 2 at a time, the alternative 4 at a time, and the magic 8 at a time. After that, we will tell you what squares to use together and how many HSTs to make from them. Don’t worry, I will link back to the relevant tutorial! But you know what they say, give a man a quilt and he’ll be warm for a while, teach him how to quilt and he’ll be warm for a lifetime… or something like that, anyway. And with that, let’s get into it!
Fabrics used from the Modern HST Sampler Kit:
Blueberry Park Fog Dotty Sunflowers, Kona Oyster
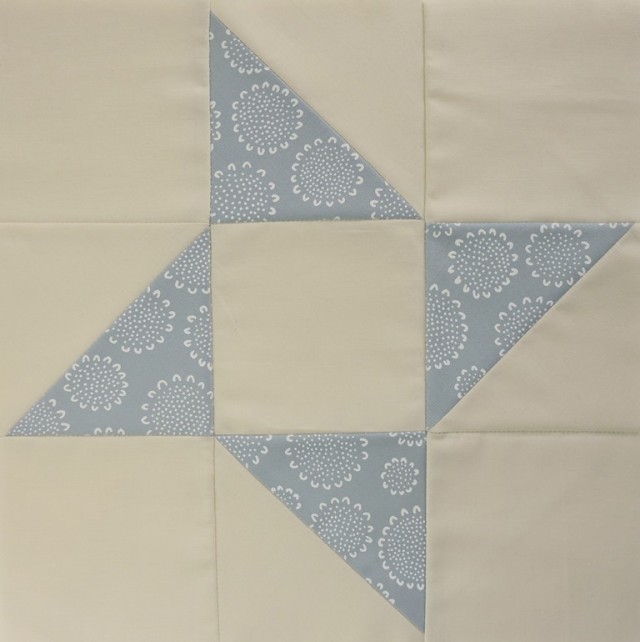
This block is traditionally known as the Friendship Star. But to me, it will always be a ninja star, AKA shuriken. And so, my block is Ninja.
Ninja
Fabric Requirements
Fabric A (blue)
1 – 7 ″ x 7″ square
Background
5 – 4.5″ x 4.5″ square
1 – 7 ″ x 7″ square
Block should measure 12.5” x 12.5”. Use a 1/4″ seam and press seams toward the darker print, or as directed.
Instructions
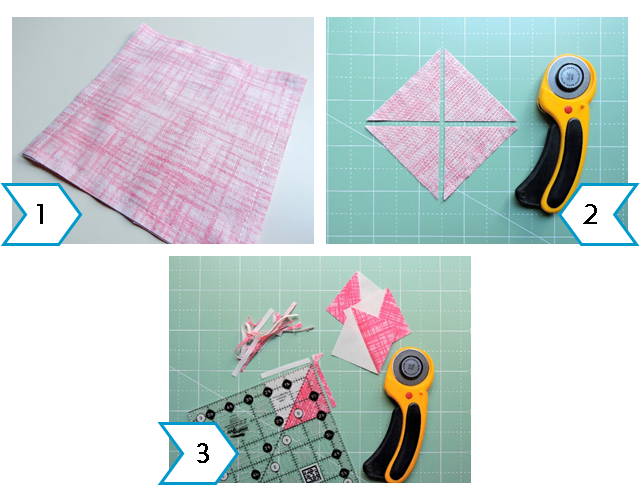
Step 1. Place the fabric A square right sides together with the 7″ background square. (1) Sew 1/4″ from the edge, around all four edges. (2) Cut on both diagonals to get four pieces. Open the fabric pieces and press the seams toward the print. (3) Trim to 4.5″ square.
Note – making HSTs this way will give you bias edges around the edges of your HST units. This simply means that they can be prone to stretching when you’re pressing, so just be gentle with them and you’ll be fine.
Step 2. Arrange the HST units from step 1 and the remaining background pieces to form the block. Sew the rows together, pressing the seams away toward the background squares. Sew the block together, press the seams away from the centre row.
Step 3. Press the block, and trim to 12.5” square if necessary, keeping 1/4″ between the outer HST points and the edge of the block.

If you have any questions, please don’t hesitate to ask in the comments.
Well, here’s a fun little way to show off your blocks! All Candy and Ninja blocks shared on Instagram using #modernHSTsampler up until January 31st, will be in the running to win a $40 gift voucher to Fabric Please! Not required, but feel free to tag us – @blossomheartquilts and @fabricplease. It’s open internationally and I’ll randomly select and share the winner on Instagram on February 1st, 2016 (JST).
Click here for all the Modern HST Sampler quilt block tutorials


Maja says
Dear Alyce, should I wear black tricot while sewing it 😉 ? Thanks for sharing all tips!
Margaret (margiestitcher) says
many thanks for this latest block, still pondering on my background fabric drawn to a dark colour
nanci says
Hi Alyce, enjoying your on-line Modern HST tutorial. I’ve completed the first two blocks, but I just can’t manage to get “all ” points perfect! I’ve read &reread your suggestion…..I know these are the easiest…
getting worried!!
I did purchase the kit, and Iam determined to get this!!!!
Alyce says
Even if these designs are simpler, every block you make with HSTs will all be great practice and you WILL get better as you go on, I promise!
Susan says
I’m not on instagram, but I remade block one today (having sent off my previous one in a swap), and made block 2. I don’t like working with bias edges, so I cut the squares on the bias and then had hst that had no bias. That, I liked!
Alyce says
Yes, that’s a great solution! Although you’re still working with bias at some point anyway, haha 😉
Susan says
True, but I sew all the way off the edge, so there isn’t much to pucker or stretch. It worked out really well, and all I had to do was clip the dog ears off. I was very pleased with the results, though I expect I’ll still do it the other way most of the time.
Alyce says
Oh that’s a great idea! I hadn’t even thought of that!