Don’t forget, if you want find out more about this foundation paper pieced sampler, you can check out this post for all the info. And if you need to brush up on your foundation paper piecing skills, I’ve got a post for that too! I got you covered on all bases!
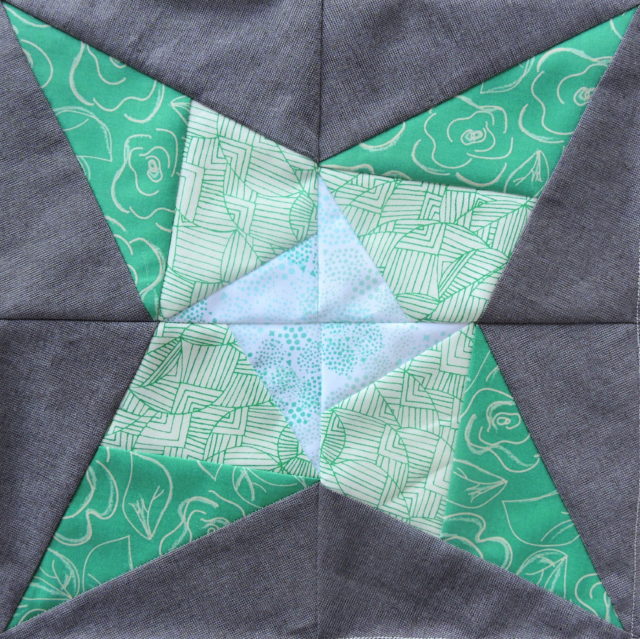
Vega is block number five, and yes, you guessed it, it’s the fifth brightest star in the sky! In fact (and this is a total coincidence I didn’t know until researching it to write this post), it comes into viewing in the northern hempisphere in May. That’s this month! Plus, in Japanese it’s sometimes called Tanabata, for which the festival is held in July, and what was our first ever Japanese festival when we moved there. That’s a bit neat. Anyway, you can download it for free this month from my Craftsy store!
Vega
What you’ll need
Vega pattern – print 4 copies of the template at ‘Actual Size’
Paper piecing supplies – read this post for my recommended paper piecing supplies
Pattern notes
- Templates should measure 5 1/2″ square.
- A4 and A5 are the background sections.
- When you have pieced all four templates, arrange them so that each A1 section is in the centre of the quilt block.
- Sew the templates into pairs, pressing seams in alternate directions so that they nest when you sew the block together.
- Sew the block together and press the seam open.
- Quilt block should measure 10 1/2″ x 10 1/2″.
In regards to fabric choice, this is one block where you really want to make sure there’s some contrast between your prints. If they’re too similar in colour, design, or scale (i.e. don’t use three small floral prints), it’ll be a lot harder to see the three different sections of the star.
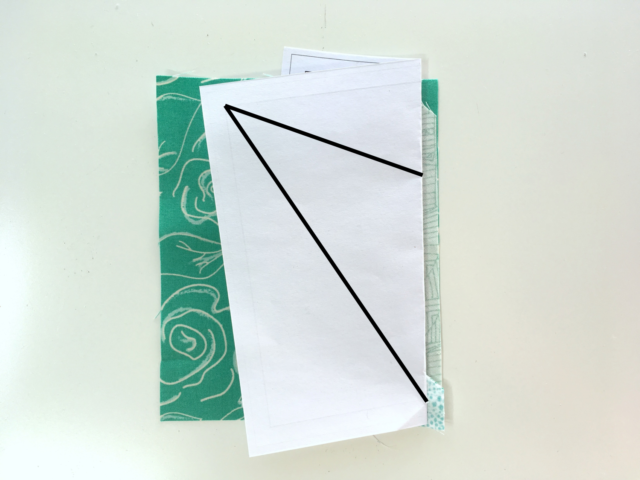
This block has a trickier angle for A3. This is when you really need to use the Butterfly Rule. This is when your new fabric and its template create a mirror image as you’re getting ready to sew that seam; like butterfly wings. The easiest way to check you’ve got it right is after you’ve folded back the paper to trim the seam allowance, you keep it folded as you place the next piece of fabric under your template. Like so:
I’ve added some lines to show where the outline of A3 is, and you can see that it covers the dark green fabric underneath it with at least 1/4″ around each edge. This is why I provide square or rectangular measurements for the cutting instructions – it makes sure that there’s enough to do just this. Yes, they’re generous and there’s wastage, but it means there’s wriggling space just to make sure we’re all ok. Very beginner friendly.
Block 6 will be out on June 1st (AEST), and this block will no longer then be available for free. Make sure to download it now so that you don’t miss out! You can also sign up for my newsletter so that you don’t miss out on future block announcements.
SHARE YOUR BLOCKS
Looking for how to show off your masterpieces? If you’re on Instagram, use #milkywaysampler and feel free to tag me too – @blossomheartquilts! There’s also a fabulous community happening in the BHQ Facebook group where many people are sewing along to this QAL too.
This post contains affiliate links. It just means if you make a purchase, I receive a small commission. Thanks for your support!


Denice says
Hmm, Vega block finished at 9.5 inches. How did I manage that?
Alyce says
Being a full inch out, I’d say it wasn’t printed at “actual size”, or 100%. Did you measure the template or the 1″ test square beforehand?
Denice says
I thought so, but I must have goofed. I reprinted, double checked, and made a second Vega block. It’s a beautiful 10.5 inches. Thanks for a great project!
Alyce says
Oh great!! Glad you got it sorted 🙂
Rosalee says
Another fantastic block, thank you “sew” much!!!
Alyce says
Haha, you’re welcome.
Margaret Andrews says
Thank you so much. I am so enjoying these paper pieced blocks and the sewing tips.
Alyce says
Oh yay!
Susan Nixon says
Great design, and it doesn’t look too hard to do. Thanks!
Alyce says
Easy peasy!